
.
It's often been said that the best things in life are free, but after spending more than my fair share of quality time with the free listings on craigslist over the past few years, I'd have to disagree. My sincerest apologies, but just I don't consider 50lbs of loose gravel, 8 half-filled cans of old paint, and about 500 broken televisions to be "the best things in life." Of course, I did once watch Stop! Or My Mom Will Shoot twice in the same day some number of years ago, so maybe I'm just nuts.
Regardless, I will admit that every once in a while something pretty decent finds its way into the craigslist free listings, and when this happens I'm more than happy to swoop in for a non-purchase. Just such an occasion arose when I stumbled across this lovely little end table amidst the free listings a couple of months ago: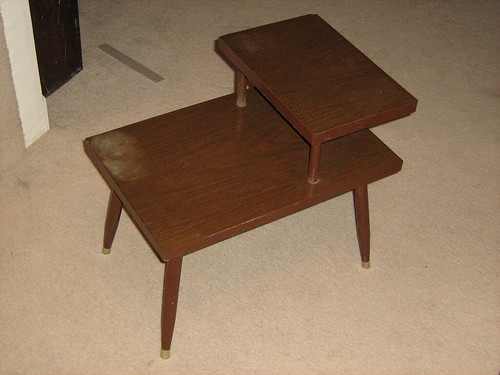
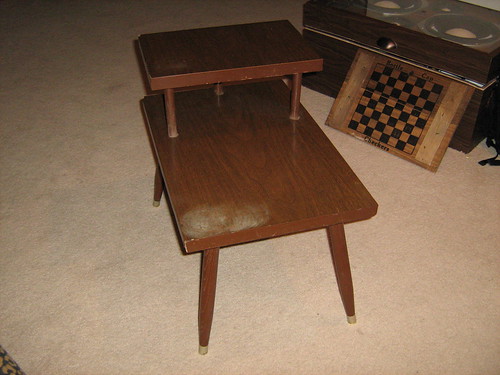
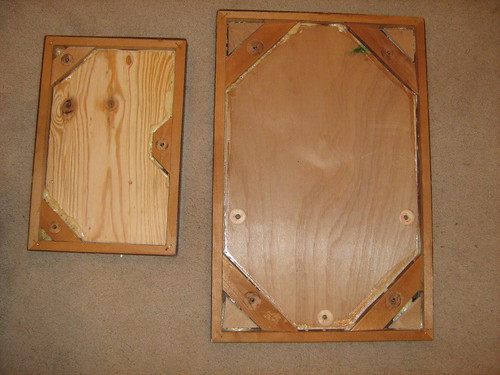
It certainly wasn't the most striking table at first glance, nor was it in particularly great condition (that stuff that appears to be white residue in the pictures is actually spots where the table's "wood" finish was bubbling and flaking off like the skin on Ed Asner's back), but it definitely exhibited that impractical charm of the 1970's on a structural level, so I thought I'd give a go at refurbishing/modifying the little fella.
Editor's Note: If while reading this post you find yourself wondering why few modern coffee tables feature 2 levels stacked on top of one another, it's because that design is idiotic. I mean really, what's the advantage to having half of your coffee table higher than the other half?
"This way I can keep my drink on the lower half and my TV Guide on the upper half, that way if I spill my drink my TV Guide won't get wet! It's genius!"
Really? You still purchase TV Guide? What long since forgotten decade do you think we're living in? Are you aware that there's a vaccine for polio available nowadays, Mr. Vanderbilt? Ridiculous. Alright, this tangent has run its course...
For this project I decided to break with Good Rubbish tradition and actually plan out what I was going to do before I did it, so I took one of my pictures of the table and screwed around with it a little bit in Photoshop, trying to find a mixture of colors and designs that made the table look really dapper (or "sharp" or "keen" if you'd prefer a different antiquated adjective). I was originally hoping to paint it red, yellow, white, and black to give it an old school German feel (I'm Norwegian and Swedish, don't ask me where the German impetus came from), but after trying a bunch of stuff out I just couldn't get the yellow to work, so I cut it from the picture and came out with the following design for deliciousness: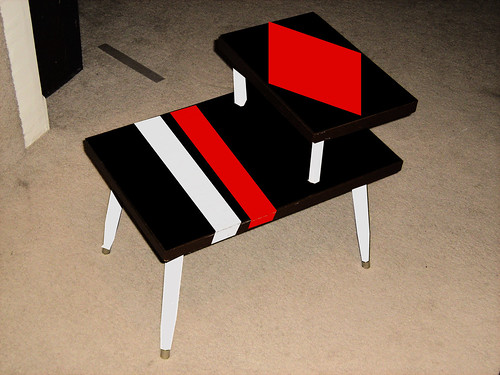
With my plan in place, I set myself to remedy some of this table's glaring structural flaws, most notably the fact that the table surfaces were made out of 1/8" thick (and 30 year old) masonite, meaning that anything (be it a glass of water, a cornbread muffin, or a paper clip) dropped onto the table from a height of more than 2 inches would either crack the hell out of it or just fall directly through it like a rock through wet paper.
To fix this problem, I cut up some 1/4" and 1/2" sheets of plywood that I got from the cull bin at my local Home Despot (these two boards cost me a whopping $1.10 American... I love the cull bin) and glued them to the masonite using Gorilla Glue, which is far and away the most powerful wood glue on the market (its only downside being that it expands as it hardens, as you can see from all of the frothy residue surrounding my plywood in the upcoming photos). Here's a little before an after action for ya, though the pictures aren't particularly interesting: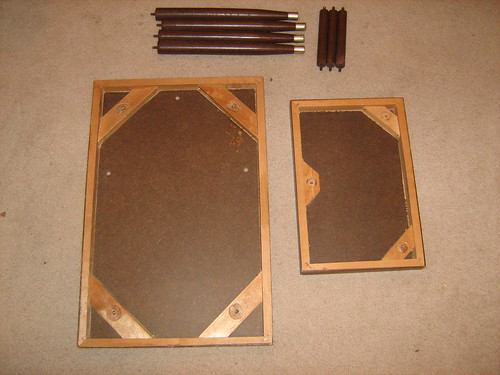
An added upshot of this structural support was that it raised the table's total weight from a paltry 1 or 2lbs to a substantial 8 to 10lbs, which removed a lot of the general feeling of cheapness from the table as a whole. Up next a more daunting challenge: The general feeling of ugliness.
Once that glue dried, I busted out my brand new power sander and stripped off the nasty laminated wood grain veneer from the table surfaces. Now, I'm pretty certain that any credible scientist would agree that this table was constructed using no fewer than 78 cancer causing substances, so I not only did this sanding work outside, I waited until it was windy as hell so the dust and debris from the table would instantly be lifted into my neighbor's yard. And they thought I'd never get them back for stealing my newspapers... well I got news for them: Lymphoma trumps newspapers. End of story.
By hand, this part of the project would have probably taken about 4 hours and resulted in the loss of one or both of my arms, but with the power sander it took all of 15 minutes (technology is good) but unfortunately the sander doesn't work very well on round surfaces, so I had to use my rotary tool to clean those off.
My rotary tool was able to strip the paint off the table legs really quickly, but the downside of the using that tool for sanding is that it spins so fast that you'll often end up carving pits into your project like cruel lady fortuna once carved pits into the adolescent face of Tommy Lee Jones. As such, after I was finished stripping the paint off of them I had to coat the legs in wood filler then sand that filler down by hand to achieve a smooth finish. Somewhat of a pain in the ass, but it would have taken much longer to just sand the paint off by hand from the get go.
After all that mind numbing cleaning, here's what we had: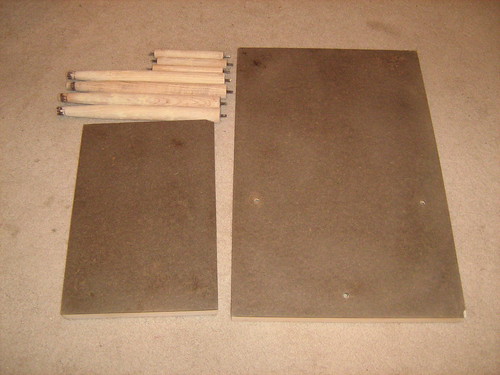
With all of my prep work completed, I prepared myself for the painting portion of this modification by watching a 3 hour mini marathon of the Golden Girls. What can I say? Estelle Getty has always had a calming influence on me.
If I had the chance to do this again (note: I have no interest in EVER doing this again) I would lay down the black base coat first, then paint the white and red parts over it, but I for whatever reason opted to go the other route and paint the red and white first, then paint the black around it. Lesson learned.
The paints that I used for this (Ace Hardware brand semi-gloss acrylics, if you really must know) were extremely thick, but for whatever reason the red and white colors (particularly the white) required about 6 coats to reach the color I was looking for, so I spent a certifiable assload of time reapplying paints over the masking tape outlines I'd created (you can read about this in chapter one of my upcoming book, "why this coffee table project took fucking forever to finish"). I also found that creating visible grooves in the paint with my brush was unavoidable, so I alternated the direction of my brush strokes on each coat of paint to create a checkerboard-ish kind of pattern. It's not easy to see it from a distance, but you can definitely notice it up close, and it looks pretty sweet by my estimation.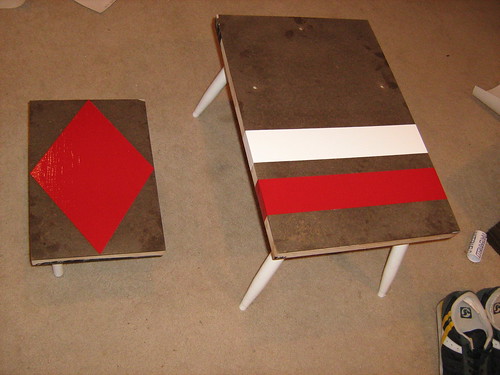
Now, I'm sure there's another way that I could have done this... I mean, there has to be a better way... but the only way I could think of to paint in the black areas involved my taking a tiny brush and meticulously painting a thin line of black around all of the white and red areas to give myself a little room for error, then filling in the rest of the black parts of the table with a conventionally sized paint brush. Yeah, this part was earnestly awful (this will be explained in greater detail during chapter two of my upcoming book, "why this coffee table project took fucking forever to finish"), but I got through it. Hooray for me.
Once I got the black in place, I did a few touch ups on the red and white (not surprisingly, I made a few errors while trying to color around those lines), then stuck the little metal leg caps into their places and gave the table a once over. That's when I noticed a new problem: the legs were extremely uneven. Fuck.
I won't go into great detail here as this post is already 46 pages long (if you really want to know more about it, check out chapter 3 of my now thrice referenced upcoming book, the name of which I'm not going to type out again as I feel the joke is already pretty played out), but I had to cut off the ends of 3 of the legs, then sand down some of the bottom of the legs (because the caps wouldn't go any higher on the legs without some of the taper being shaved off), then do more paint touch ups, then reapply the leg cap things. After all that I checked the table again and it still wasn't completely level (though it was a lot better), so I just decided to cram some epoxy putty under the one uneven leg and call it good. Me and this project? We were so over each other at this point.
For the sake of durability I slathered on a couple coats of polyurethane, then sat back in admiration of my stirring accomplishment. Care to do the same? Of course you do.
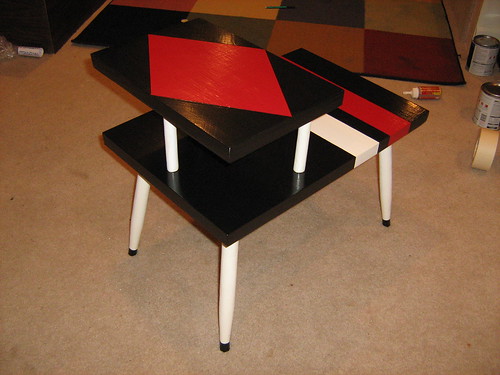
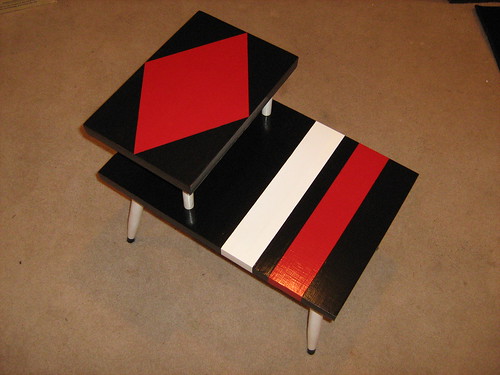
My friends, that right there is some pure, unadulterated, table on table action. It's so hot that I feel I must be sprayed down with water. Some call this a "shower", I just call it the next 20 or so minutes of my life. Until next time, keep on doing what you're doing... unless of course what you're doing is really disgusting, in which case you should go do something else. Like a ferret. Yeah.
.
Wednesday, May 7, 2008
WHY I LOVE THE FURNITURE DESIGNERS OF THE 1970'S - A ONE PART EPIC
![]()
Subscribe to:
Post Comments (Atom)


5 comments:
Did you consider using a buffing surface on your newly acquired power sander to modestly take down the paint brush lines before applying the polyurethane coat?
Interesting idea, Dr. Mangilord. Indeed, I must admit that I hadn't thought of doing such a thing, but even if I had wouldn't the buffer have caused the different colors of paint to smear and smudge into one another?
For the record, I sanded the polyurethane between coats, which removed a lot of the tactile bumpiness from the table while retaining the same visual effect. Considering that I really (really, really, REALLY) don't want to have to do touch ups on this thing again, I'm thinking about putting on 3 or 4 more coats of polyurethane to really give this beast a thick protective coat... if I end up doing that, I'm sure no one (save the late Lillian Gish, whose velveteen touch was the stuff of legends) would be able to feel the bumps in it at all.
That thing is Crap-tacular (spectacular crap get it? ha ha heh... fuck you, that was funny)
In all honesty, my parents had some of these tables when I was growing up, and I always thought they were ugly as sin. You sir, have made the table look like a fine piece of funky art, that while still not my taste, is as much a leap forward as fire and salt was to the keeping of meat in the days of John McCain's childhood. Fine Job, young McHanslaw. Fine job indeed.
ten years too late....but, the design of the table was intended for the huge black rotatory style phone to be placed on the top shelf so you could walk by and "get the phone" and the space beneath the phone is where the phone book goes.....you could get to both without walking around the table, The first floor of the table was for the huge ashtray,,,,
Post a Comment