
.
In recent weeks, the world of Good Rubbish has taken a bit of a turn away from its original (and plainly stated) intention: To make stuff out of crap. In an effort to remedy this growing problem, I present to you the following repurposing post, but only on the condition that you don't give me any flack when I post another crappy t-shirt design later this week instead of cranking out a new legitimate project.
ALSO, though I haven't grown violently ill over the past few days, this mild lung infection of mine seems to be noticeably hampering my ability to think clearly, so please accept my apologies if this whole post reads like... uhh, what's the word I'm looking for here? Oh yeah, "crap."
Recently I've been getting asked by a lot of folks I pass on the street (and by "a lot of folks I pass on the street" I actually mean "no one") what my methodology is like when I'm trying to come up with a new project. From where do I draw my inspiration? What is my impetus for creation? Who or what is my muse? Why is Tyler Perry famous?
These are difficult questions to answer, but I suppose these projects come to me in one of two fashions... either I find them, or they find me. Perhaps I'll describe this process of epiphany in greater detail at another time (you know, like when I've completely exhausted all other topics for me to run my mouth about), but for now just accept the following expansive tale of woe and triumph as an anecdote for how a project can find me:
Father McHanslaw bought some kleenex over the weekend, and the boxes that those kleenex came in looked like this...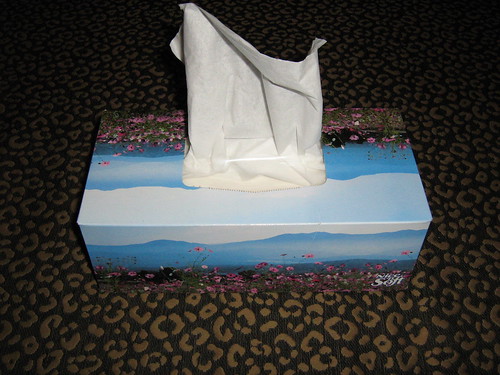
"Egads!" I thought to myself, "that is a fucking ugly box of kleenex, right there." At this point I decided that I needed to mask the appearance of this hideous box of facial tissue so that it wouldn't have another chance to sully my precious field of vision.
Thus ends my enthralling anecdote about how a project can find me, I sincerely hope you enjoyed it.
Anyway, I could have gone a couple of routes with this project. The first route would have been to cut out some images of Julie Andrews and some Nazi Storm Troopers to turn the mountain scene pictured on the box into a lovely homage to The Sound of Music, which would have been really funny but would have also been severely lacking in the permanence department (as once the kleenex ran out I'd be tossing the box in the recycling bin). As one of the world's preeminent pack rats, I like the stuff I create to be able to hang around for at least 20 or 30 years beyond the date when it becomes useless and/or entirely irrelevant, so the first option just wasn't going to work for me.
After messing around with various found objects for a short while, I soon devised a combination of cds and cassettes that would adequately cover up the box's ugliness, so I headed out on the town to get my supplies. And yes, for the record I'm well aware that I've already done a project using old cassettes to make a box, but you know what? I like pigeonholing myself. I find it both entertaining and satisfying to revisit old solutions and fit my creativity into as narrow of parameters as is possible, so if you don't like it you can just go read something else (editor's note: please do not go read something else).
INSTRUCTIONS
If you want to do this project yourself, you'll need the following things:
1. 6 cd jewel cases with interesting cover art - I was able to nab mine from a .25 cent bin at a local used music store, if you can accomplish the same feat of thriftiness I'd encourage you to do so.
2. 4 audio cassette cases - I went with 2 Kenny Rogers releases and 2 albums from Neil Diamond, which I only point out because I like to flaunt my impeccable taste in music.
3. Some plastic adhesive (I've found Goop glue works the best). You also might want to use some epoxy putty in some spots to make your glued joints extra strong, but that's up to you.
4. Various corner brackets and metal plates to reinforce the glued joints between your cds and tapes (you'll need at least 8 corner brackets, though their size is inconsequential).
I also used some decorative corner covers (visible in the upper right corner of the picture below) to polish up the final product's look a bit, but those are entirely optional.
The first thing you'll want to do is glue all of the doors to your cds and cassettes shut so that they won't be flopping open all the time. You can choose whether you want to leave the cds in their cases, but I'd advise you to take the cassettes out of their cases before you glue them shut, as gravity's eventually going to be exacting a toll on those cases so you'll want them to be as light as possible.
Once the glue on your doors has dried, glue the sides of your audio cassettes to one another in the manner pictured below. If you have some sandpaper available it's always a good idea to rough up the places that you'll be gluing together before you apply any adhesive, as this helps create a more permanent bond.
After that, glue together the edges of 4 of your cds (2 sets of 2) in the same manner. These will probably be the most visible walls of your kleenex cover, so you'll want to use the 4 cd designs that you like the best. If you have any sort of flat metal plate available, it's also a good idea to glue it over the joints that are holding together your two pairs of cds, as that's a really long joint that's held together by a very thin strip of glue, so without any support it's going to be dreadfully fragile.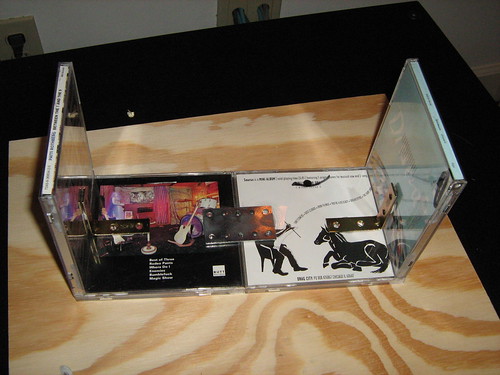
As you can see in the picture, you're next going to want to put up the side walls of your cover. It'll probably be difficult to get these to stand up on their own, so you'll want to attach your corner brackets at the same time (this will also ensure that your side walls stand up at a 90 degree angle, instead of drooping one way or the other).
This is important: Your side walls rest ON TOP of the 2 cds you have lying face down, not to the side of them. If you glue them to the sides of the 2 cds you have lying face down... well, I don't even know what will happen, man. I'd have to assume that the consequences would be dire.
Once your glue dried enough that it's somewhat stable, glue your other pair of cds to the missing wall of your compact disk rectangle. You can do this standing up (pictured), or lying down, or while squatting, really it's up to you.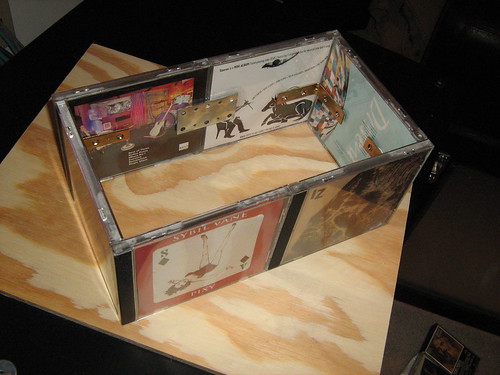
Flip your cd rectangle upside down (so that all of your cd covers are... well, upside down), then set your 2 sets of glued together cassette cases face down in the spaces shown below. Glue the side of your cassettes that will be touching the short side of your cd rectangle to that side, but there will be a very small gap (probably 1/16th of an inch on each side) between your cassettes and the long sides of your cd rectangle, so you'll need to put a corner brace on each side to keep those sides stuck to each other.
Wow, could that paragraph have been any more confusing? I don't even know how to edit that debacle... look, just make whatever you've got in front of you look like what's in the picture below, alright? My brain's not working well enough right now to explain this shit in a written format.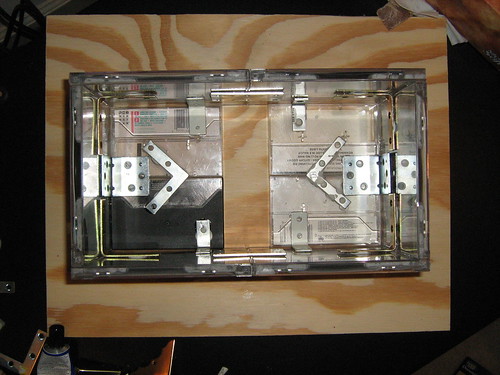
As you can see, I chose to go a little overboard with the support braces, but the only ones you really NEED to have in place are the 4 corner braces on the side walls, the two metal plates on the long walls of your cd rectangle, and 1 corner brace on each long side of your cassette pairs (4 in total).
Once everything's set, your box is absolutely ready to go. If you're curious as to how snugly the kleenex box fits into its new cover, the next couple of pictures should give you some insight: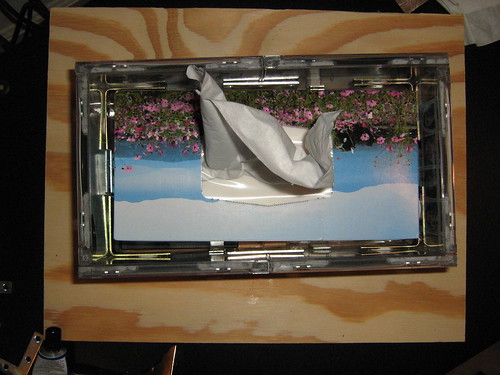
Horizontally it's just the right fit...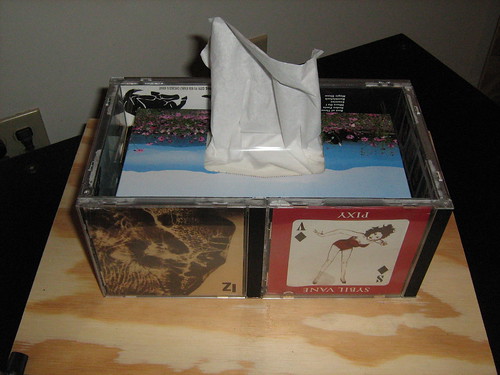
...though vertically it's about an inch taller than an ideally sized cover for this sort of box. Still works though, therefore I file this structural flaw under the heading, "honestly, who gives a shit?"
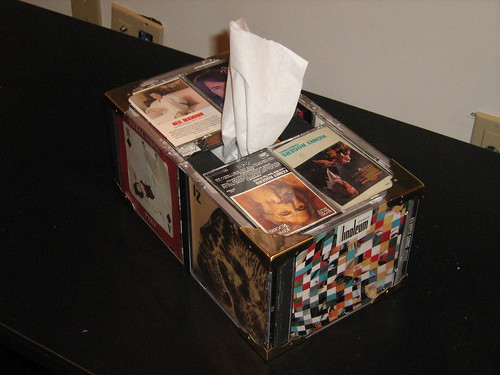
I opted to make a couple more modifications before I called this project finished... these are entirely unnecessary, but I do think they contributed a lot to the final look of the cover. I glued in a couple strips of black foam rubber stuff that I had lying around on the sides of the gap where the kleenex come out, as you could still see the hideous box beneath in those spots. I also added some decorative corner guards in the hope that it would make whole thing look super snazzy. That hope may or may not have come to fruition, you be the judge: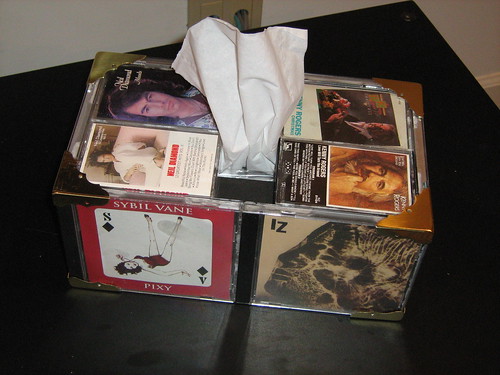
Thus ends the single least cohesive post in the short history of the Good Rubbish weblog. I hope you've enjoyed it... actually that's not entirely true. I hope you skimmed it and looked at the purty picchers without reading any of my rambling prose, because I'm pretty sure none of the verbiage here makes any sense. I'm not even going to reread it, I'm SO done with this post.
That's it, I'm going back to bed. Wake me up when my brain decides to start working again.
Tuesday, April 15, 2008
REPURPOSING: HOW TO CREATE A KLEENEX BOX COVER THAT GOD HIMSELF WILL FROWN UPON
![]()
Subscribe to:
Post Comments (Atom)


No comments:
Post a Comment