
.
Note: If you haven't already done so over the past few months, feel free to check out part 1, part 2, and part 3 of this beast of a project by clicking the preceding links.
Friends, countrymen, Rubbish-ites of all creeds and colors, what follows should be the first truly spectacular post in the depressingly lackluster modern history of this once proud blog. And why is that? Because, simply put, the object I created during the creation of this post is hands down, bar none, categorically, beyond a shadow of a doubt, without question, exception, or dispute; and undeniably, unmistakably, and unequivocally the single coolest thing I have ever made.
Don't believe me? Then read on. Believe me? Then... well, read on also. If you're on the fence though, I'd suggest watching a few episodes of Roseanne on late night Nickelodeon before coming back to the previous paragraph to reevaluate your feelings about the whole thing. I've always found Darlene's saccharine smile to be a most restorative elixir for my analytical capabilities - perhaps you'll find the same to be true for you.
As a side note, a cursory look over Nick at Nite's current programming lineup should lead any pop culture aficionado to realize that something has gone horribly wrong in TV Land. Just think of all the ludicrously awesome classic tv that they could be running on that network - Welcome Back Kotter, Head of the Class, ALF, Hogan's Heroes, Welcome Back Kotter, The Greatest American Hero, Welcome Back Kotter, Welcome Back Kotter, and Welcome Back Kotter, just to name a few - and then look at what they're choosing to actually run: Home Improvement, Roseanne, The Nanny, Malcolm in the Middle (indefensible... positively indefensible), Family Matters, and Everybody Hates Chris. Wait, what? Everybody Hates Chris?? Didn't UPN cancel that show about 2 weeks ago?? What kind of classic TV is that??? Boo to you, Nick at Nite. BOOOOOOOOOOOO!!!!!!!!!!!!!!!!!!!!
As you may or may not recall, the singular intention of this massive project of mine was to take my oft-ballyhooed Speaker Media Cabinet and make it even awesome-er than it already was. A weighty challenge, no doubt, but one that I felt more than capable of grappling with (particularly after I decided to give myself about 13 months to get the whole thing finished, but we need not venture into the lurid details of my unfaltering laziness).
I'm not sure whether any of my previous posts explained exactly why I decided to redo this project, but just in case they didn't, there were 2 primary reasons for my wanting to rework this beast:
1. The chipped, pitted, and peeling simulated wood grain paneling on the outside of the cabinet made this thing a bit of an eyesore up close. A very cool, functional eyesore, but an eyesore just the same.
2. In my post detailing the original creation of the cabinet, I mentioned that I kept the shelf-supporting L-brackets in place by using epoxy putty to attach them to the inside of the speaker box (pictured in the 4th photograph from the bottom in the previously linked post). While this method of adhesion may have actually worked under less idiotic circumstances, I applied the epoxy and L brackets AFTER applying paint to the inside of the cabinet, so the epoxy putty didn't actually adhere to any wood inside the cabinet, instead it was just holding on to the outermost coat of paint. Surprisingly, the cabinet worked perfectly well for probably 4 or 5 months before, predictably (though much to my surprise at the moment it happened), one of the shelves gave way, causing a chain reaction that ripped out all of the inside shelves save the uppermost two. As such, I needed to reinstall all of the shelves anyway, so this seemed like a prime opportunity to redo the whole thing from the ground up.
We'll get to rectifying the ugliness factor in a minute, but for now let's bask in the glory that is my new shelf alignment, as it's functionally delicious:
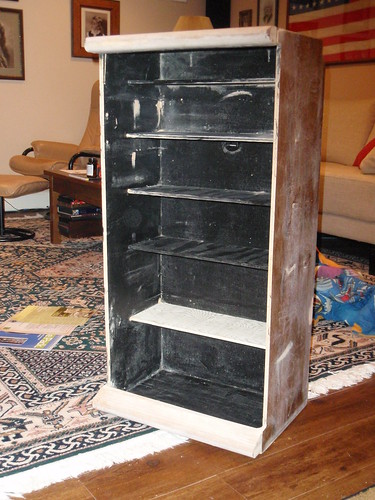
As you can see, the new shelf alignment features 5 shelves (the original cabinet only had 4), and the shelves were secured by driving nails and screws into the shelves from the outside of the cabinet, so they're not going anywhere this time (the shelves are only 1/4" thick, so as you might imagine it was a pretty monumental pain in the tuckus to get the nails in there without having them splinter out the top or bottom of the shelves they were being driven into).
I wanted to paint the whole cabinet black (white was actually my original choice, but I didn't want to deal with the whole "polyurethane makes this paint look like someone peed on it" problem that I detailed in my second toilet shelf post), so after getting the shelves in place I took some low grit sandpaper and roughed up the fake wood grain paneling on the outside of cabinet to make it accept paint a little better.

After that I painted it. It was fascinating. True story. Normally I would have provided a photo of this portion of the cabinet after it received paint, but I lacked the foresight to take a picture of the cabinet at this stage of development. Ah well.
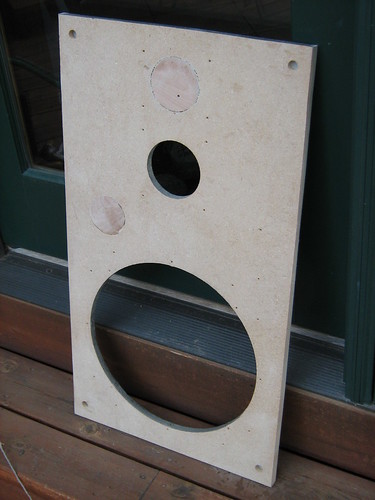
With the back end of this project taken care of (ZING!) I turned my attention to modifying the aesthetic qualities of the cabinet's door. Now, the painting on the front door was going to be far more detail-oriented than the "cover it in as much black paint as you can find" method that I used on the back of the cabinet, so (as I originally showed you in a post from several months ago) I couldn't just scuff up the paneling then paint over it. Oh no my friends, I had to strip it off ENTIRELY.
I first attempted to do this by scraping it off with a razor blade in the same way you'd try to remove a bumper sticker from a car, but that only proved to be mildly effective at best, primarily resulting in particle board burns on my knuckles and long, thin bruises on my thumb and forefinger from strenuously gripping onto the end of the razor blade like it was the only thing keeping me alive. After that I decided to put my power sander to good use and just methodically sand away the fake wood coating. While one sheet of sandpaper would only clear about 6 square inches of paneling, this method proved to move things along at about 40x the rate of the razor blade experiment.
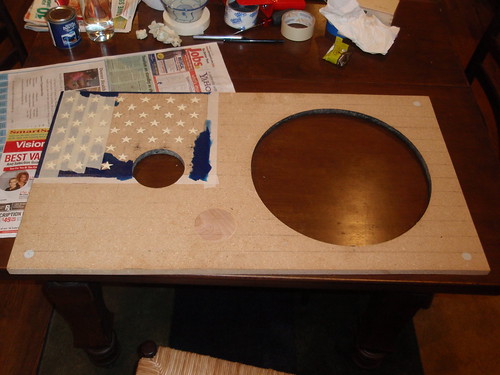
Oh, I also filled in 2 holes on the front of the cabinet with some scrap lumber I had available. The first of these holes was where the smallest of the 3 speakers was mounted (this speaker came into my possession partially dilapidated and really contributed to the overall eyesore-ness of the cabinet, so I decided to just get rid of it), while the second was... well, it was just a hole that was built into the speaker for some reason or another. Presumably for air flow, I guess? I don't know, but this much is certain: You can always count on your boy Enron to not know anything about speakers, that's for darn sure.
Once everything was cleared off, the speaker door looked a little something like this:
Please take note, as this is the part of the post where things go from being utterly boring to ludicrously awesome without any warning whatsoever. Except of course for this one, but I'd like to think of this passage as less of a warning and more of an example of me participating in self-targeted foreplay before stroking the bejesus out of my ego.
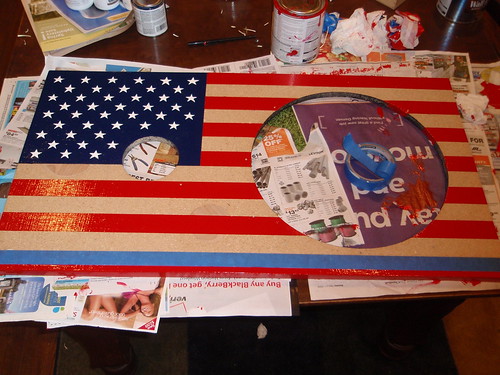
I had a few ideas for how I wanted to paint the door of this thing (one of which, as always, prominently featured Ronald Reagan and Mikhail Gorbachev), but ultimately I decided to paint the door into a giant American flag, as I am one of the foremost patriots of my generation and doing so would have absolutely no ironic value whatsoever.
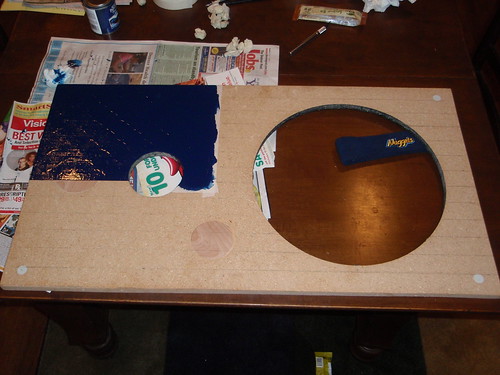
First I did some basic geometry and mapped out the stripes and where the center of each of the stars needed to be (though in an effort to not end up shooting myself in the face in mathematically deficient frustration I just free handed the actual star shapes)...
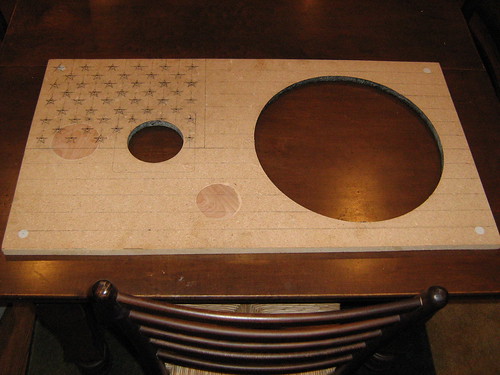
Then I carefully painted in each of the stars.
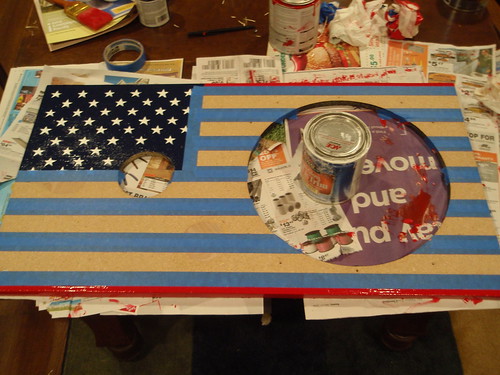
I initially tried to fill in the blue around the stars, but I soon realized that this was giving me a visibly inconsistent coat of blue paint, so I decided to put some masking tape over the top of the stars, then just paint right over the top of the tape.
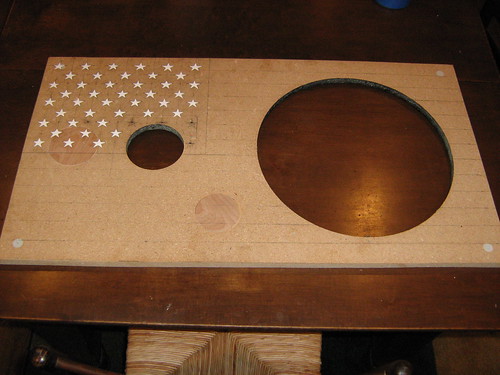
Following several coats of blue paint...
And now after carving out/peeling back the masking tape from the top of the stars...
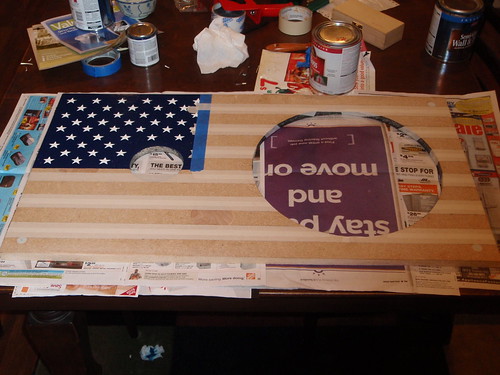
After that it was just a matter of alternating coats of masking tape, then painting in the red and white stripes. The rest of this should be pretty easy to follow, so I'll just lay out the pictures without commentary:
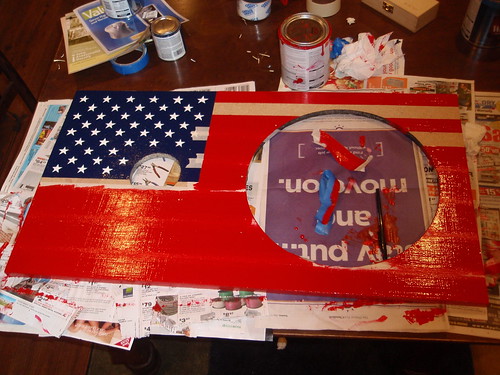

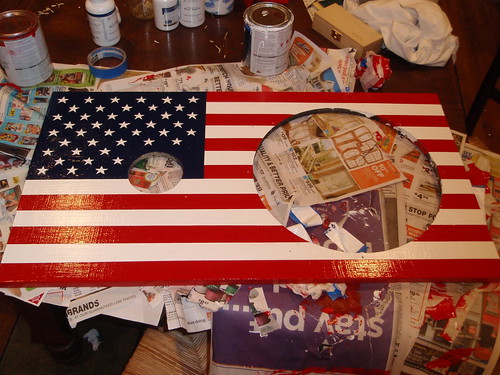
Ta dah!!
After the paint dried, I put the speakers into their appropriate positions, but something just didn't seem right about the whole thing. Sure, it was fairly cool looking and all, but it wasn't quite cluttered enough for my liking. All of that surface area at the top was really bugging the hell out of me.
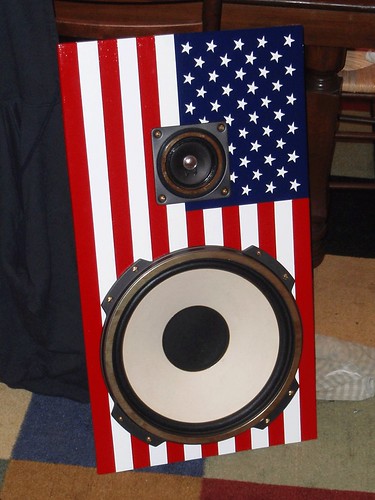
See what I mean? It's the very definition of "good, but not great." Of course, I've never been the type to strive for greatness, but just this once I decided to make an exception.
First I created some stencils using an Olde English typeface, then - using the large cone speaker as a general guide for the ark of my message - taped the letters G O D B L E S S A M E R I C A across that vast range of oh-so obnoxious open space.

After that I used my x-acto knife to carve a groove around the outside of each letter, then hand painted each letter using a fine tip brush (normally I opt for the rat hair "15 brushes for a buck fifty" painting supplies at Hobby Lobby, but because of the importance of this project I bought an 8 dollar brush at a hoity-toity art supply store solely for the completion of this step). As for the color, I decided to go with a few coats of Testor's gold enamel paint. Could I have gone with any color other than gold for this critical step? In a word, no. No I could not.

Now THAT, you must admit, is pretty darn awesome. But you know what's even more awesome than that?
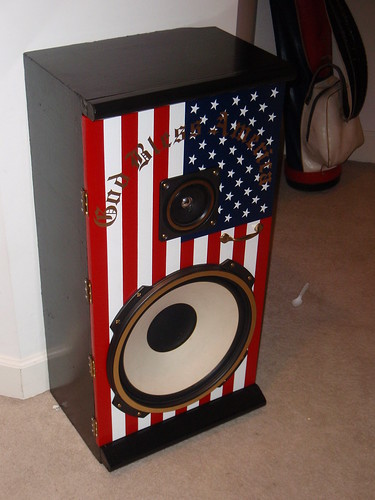
This!
As you can see, I added a horizontally aligned handle to the front of the speaker, then affixed the door to the cabinet with 4 sets of hinges (the original cabinet only had 2, but this seemed to be insufficient as the bottom of the door would always get stuck against the cabinet when you'd try to open it - I can only assume this was because the hinges were bending under the weight of the door).
Of course, form means nothing if it's not followed by function, so exactly how well does this revamped contraption act as a media storage cabinet, you ask?
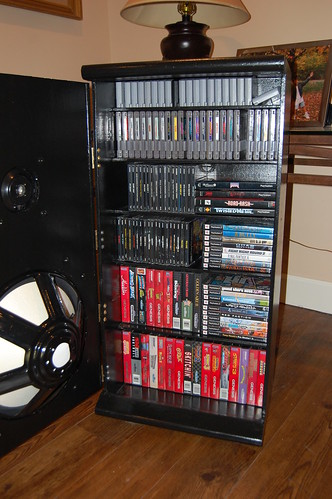
Quite well indeed, my friend. Quite well indeed.
So that pretty much wraps up this preposterously long post, but this project is NOT YET OVER! As you may recall, there's the little matter of the newly-built surrounding cabinetry for this monstrosity, an aspect of this project that I only recently completed and will surely showcase at some point in the coming weeks. Will that post be anywhere near as impressive as this one? No. No it will not. But I've always been a man who appreciates a good anticlimax, so I shall revel in its mediocrity with great delight, I can assure you of that.
Thank you most expressibly for your patronage, and I hope you have a lovely day.


3 comments:
Enron, my boy, you have managed to keep me on until the next blunder. Though I am lazy and I have low standards, so I will probably stay around for a while after that too.
In all honesty, this is one incredibly remarkable media cabinet. I wish I had it. Hell, I wish I had made it. But the new Mrs. Mann has decided that she would rather see gold zebra stripes in our trailer. Hey, what can I say: she's freaky in the sack, and I'm lazy and have low standards.
Fine job, young McHanslaw. Fine job indeed.
Media cabinet? I don't see any 8-Tracks, which are the only media that matters. Nazareth "Hair of the Dog " is only listenable with the "clunk" in the middle of the tunes.
oh, and hey, one more thing. You have bemoaned the passing of Bea Arthur before, but I maintain that unless this is your tattooed appendage, you have nothing on this hardcore fan:
http://www.urlesque.com/2009/11/02/urlbot-eliot-gets-the-best-tattoo-ever/
Post a Comment